by - Alyssa
Alright so you want multicolored eyes? It may look difficult but it's fairly simple. I'm going to assume you know about layers and things, if not again read my other tutorial. This one will include no images for now..I might add them later on.
Again you will need a decent picture to work with. Lets use this:
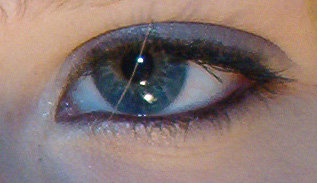
First I want to change my skin tone. So, once the eye is in photoshop, flatten it and then duplicate the layer. Next go to Image>Adjustments> Hue/Saturation. With the edit set to Master, change the Hue to +7 and the Saturation to -66 and leave the Lightness at 0. The image should look almost gray. Next, we want the eye to stay colorful, so take the eraser tool, set it to size 35, soft edge and erase the pupil and iris ONLY. Be careful around the edges.
Now, flatten the image and duplicate it once more. Then go to Image>Adjustments> Variations. Time for the first color change, I'd suggest just following me if it's your first try, but, if you dont want to use my colors feel free to experiment and find what you like. I'm going to use green, so in variations click in this order then click ok:
Yellow, Green, Darker.
Now the eye should be nice and green but we dont want it on the skin. So take the eraser and set it to a size 65 soft edge brush and erase the greenness from the skin and white part of the eye CAREFULLY going around the iris so you dont erase any of the green there, if the green is too noticeable on the pupil CAREFULLY erase that.
Now, select the burn tool and set the Range to Midtones, and the Exposure to 57%, make the brush size 21, soft edge. Now trace along the edge of the iris so you darken up the edges. Once you're done select the Dodge tool, Rage: Midtones Exposure:37% Brush: 27 soft. Go around the middle of the iris right under the pupil and CAREFULLY around the newly darkened edges. This gives the eye a little more depth and makes it look like you didn't just go over it with a paintbrush ^_^
Now, go to Image>Adjustments>Levels. Set the Channel to Blue and match these settings:
Input Levels:0, 0.60, 204
It should look a bit more 'lively' now.
Now! Time for the fun stuff.
Flatten the image, and duplicate it again (you're going to be doing this a lot now)
Now pick a spot where you'd like your first color change and select the Dodge tool and go over that spot a little (I wouldn't make it too big). Again I'd suggest following me but do whatever color you like. I'm going to do a lightish purple color. So in variations click: Magenta, Magenta, Blue, Canyon. Click ok. Now take the eraser and erase the purple from the skin, and pupil, and the iris BUT don't erase where you used the dodge tool. You should now have a little spot of purple in the eye. Now Go to Image>Adjustments>Levels, Channel: Green, Input Levels: 0, 0.60, 204, switch to Blue, Input Levels: 0, 0.60, 204. It should be a..purple/brown/bluish color..I don't really know what to call it ^_^.
Flatten the image, and duplicate it yet again. (I said there was a lot of this on the way..)
Now, again take the Dodge tool and lighten the next part you want to color. I'm going to do it on the left side of the part I just colored. So go back to Variations and click:
Yellow, Red, Magenta, Blue, Blue, Canyon, Blue, Canyon, Canyon, Ok. It should be a nice blue now. So take the eraser and do what you did before, leaving the dodged part blue. If you want it a bit darker (I do) go to Levels and set it to Green, 0, 0.60, 204.
From now on I'm just going to say what I've done, sense you get the idea of what to do.
Flatten..duplicate..
Dodge.
Variations: Canyon, Blue, Magenta, Red, Yellow.
Erase.
Levels: Green: 0, 0.60,204 Blue: o, 0.60, 204
Flatten
Duplicate
Dodge.
Variations: Canyon, Canyon, Blue, Green, Green, Magenta.
Erase.
Levels: Change all Red, Green and Blue to 0, 0.6, 204.
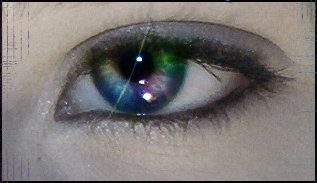
And now you're done coloring! Unless you still have spots you want to color ^_^ So now select the Dodge tool and go around the inside of the iris once, and again if you want it lighter, now save your image and show your glory to everyone!
Alyssa