by - hudzi
Take a deep breath and open Photoshop. Yes it's pretty empty, but nothing to be scared of really.
Beforehand you should maybe have in mind what you would like to create, but not necessarily.. This picture arose out of pure boredom paired with testing out some new techniques. Of course you should have some stock - photos or own ones, which is for usre nuts and bolts.
Step 2
After some research I took these pictures m but of course it is up to you to choose your own. Make sure you save them under the name of the artist, so you can easily linkback and a better overview. The artist that offer us their material to use are so friendly so the fair thing to do is let others find out about them as well. (so link back to them)
Suriastock ( get the rust image); Kitty-Stock (get the eye image)
Step 3
So then, let's get started , huh?
Open both pictures and cut the "eye" picture into the size you want to work with by using this tool:![]()
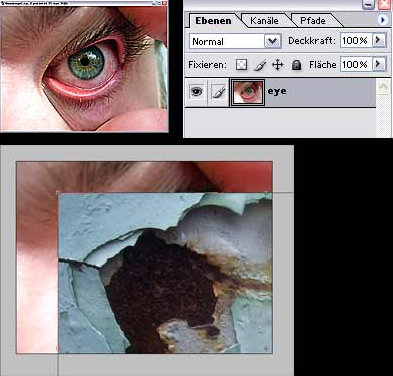
I'm clumsy so I avoid to work on the basic foto. What I do is, I copy the whole picture and paste it into a new one. You can do that with Ctrl & a (to mark all) then press Ctrl & c (to copy). then go on File -> New and it will open a working space with the same size as your picture. Just paste it into by pressing Ctrl & V (to paste)
Do the same with the texture and past it into your new workspace. It should place itself on a new layer automatically. In this case, I sized it to the same as my eye-foto. You can do that by having the texture-layer marked and pressing Ctrl & T. Now you can size it, but keep the Shift key down to avoid that the picture will lose its original shape. Hit return and there you go. Move it over your eye picture and lets get busy.
Step 4
We first want to do some work on that eye. In your layer box you got an eye, showing when a layer box you got an eye, showing when a layer is active. By clicking that eye you deactivate the layer. Do so with the texture layer and click on the eye layer to work with it. You should now only see the eye layer.
On the bottom of you layer box you can add a new layer. We will need one to make the eye glow some more.
Use the round selector tool and create a shape inside the eye. It should be a bit smaller , fill it with white colour.
Somewhere up in your menu you can change the size of your selection. Chose the one to make it smaller. I used 40 pixel for it, but that's a taste thing. Hit " Ok" and the selection is now much smaller than the white circle will have a hole. Deselect all by using the combo Ctrl & D.
Now we should blurr it a little, to soften the edges and additionally it gives some transparency as well. Use the Gaussian Blurr Filter and a radius of 9,5 pixel, or whatever you think fits best.
Lets make this look more real now. This is a german version of Photoshop so be gentle with me trying to sort out how it is called in english.
In your layer box you can change the behaviour of your layer with a drop down menu. Play around a little and you can see what each effect does. I used the one "copy into" and you should get a similar result.
Ok, looks pretty neat now but lets say you definitely want to change the eye colour a bit. And of course you also would like to get rid of the intense veins.
So lets combine these 2 layers. Easy peasy, just Ctrl & e.
After that you again should have only 2 layers. The one with the changed eye and the deactivated texture layer. We stay on the eye layer and duplicate it by doing a right click on it. Now get yourself "the-tool". Go under your main Photoshop menu, choose the drop down "image" and follow under "settings" at the bottom you should see a link called "variations".
I ended up by giving that layer a heap of blue, but play around a bit - you will love it. So now you got 3 layers. One being totally overcoloured, one texture layer and of course the other eye layer.
Move the "normal" coloured eye layer over the blue one and again use the variations-tool. This time chose saturation and remove the colour, but not all.
So now you should have an overcoloured blue layer, one having very few colour and your deactivated texture layer, right?
( follow the image )
Step 5
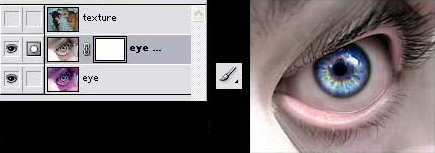
What about working with masks now? Select the layer with less colour (in my case: eye kopie). In your main photoshop menu you will find a drop down menu which is all about layers. You now chose something like "add mask" and a side menu opens from which you chose "nothing masked". Take a look at your layer box, there should be an additional working space in the layer.
Be sure that the colours on the right have black on top, else it wont work.
Now take a brush ( I took the size of 65) and paint in the eye. You will see how you set free the layer beneath and your green eye will trun into blue. Press Ctrl & e to turn them into one layer.
Step 6
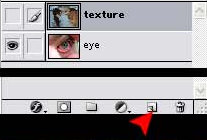
Ok, this didn't really hurt, did it? We almost forgot about the texture. Re-activate the layer witht the texture by clicking on the little empty box without eye. Select it and change the layer option with the drop down menu into "multiply". Move that layer until it fits your satisfaction.
Then play around a little with the "variations" tool. The one you changed the colour of the eye with. I gave the texture layer a lot more darkness and a tiny bit more blue. Made the dark parts darker and lightened the light parts of it.
Duplicate the eye layer with the right click, then press Ctrl & e to get the texture layer on one layer with one eye layer. Looks a little dark now doesn't it? Ok, lets change that.
Put the first layer again into a state of "multiply" and then use the "variations" tool to pull up the light, by making light parts brighter.
Play around as much as you think is needed, add some brush work to darken unwanted bright spots and you are done.
( follow the image )
I hope this helped a little. There are many people out there using totally different techniques to come to the results they want. This was just one of my ways to do it so always experiment and find your own techniques.
( final image full view )
hudzi